- Какое масло заливать в АКПП 01M VW (095/96), 01P(098)
- Оригинальное масло для АКПП 01M VW (095/96), 01P(098)
- Аналоги для АКПП 01M VW (095/96), 01P(098)
- Сколько масла в АКПП 01M VW (095/96), 01P(098)
- Регламент замены масла в АКПП 01M VW (095/96), 01P(098)
- Как проверить уровень масла?
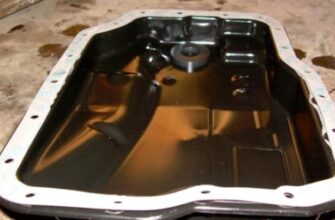
- Замена масла в АКПП 01M VW
- Акпп 01p замена масла
- АКПП модель 01P (EuroVan MV 2001-03)
Какое масло заливать в АКПП 01M VW (095/96), 01P(098)
Известная многим автомобилистам 4-ступенчатая автоматическая коробка переключения передач. Появилась в 1995 году и является собственной разработкой специалистов Фольксваген и Ауди. Ставилась на многие переднеприводные автомобили с поперечным расположением двигателя с рабочим объемом от 1.6 до 2.0 литра.
Двигатель расположен поперёк для легковых автомобилей VW и SСODA — 095/096/01M. 098/01P – двигатель расположен поперёк для микроавтобусов и минивэнов.
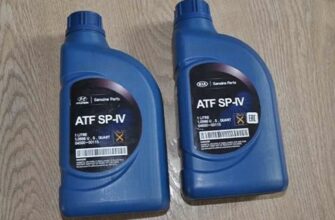
Оригинальное масло для АКПП 01M VW (095/96), 01P(098)
Оригинальным трансмиссионным маслом для этой АКПП является трансмиссионная жидкость собственной разработки концерна VAG — ATF G052162A2.

Средняя цена: 1400 рублей
Аналоги для АКПП 01M VW (095/96), 01P(098)
Существует довольно большое количество аналогов оригинального масла, соответствующие и удовлетворяющие требованиям производителя.

Средняя цена: 750 рублей

Средняя цена: 800 рублей

Средняя цена: 890 рублей

Средняя цена: 860 рублей
Сколько масла в АКПП 01M VW (095/96), 01P(098)
Для полной замены масла в АКПП со снятием поддона и последующей заменой фильтра потребуется 5.6 литров.
Для полноценной замены потребуются еще такие расходные материалы:
Фильтр АКПП 096:
артикул VAG: 095 325 429 D
Прокладка АКПП 096:
артикул VAG: 095 325 443 A
Регламент замены масла в АКПП 01M VW (095/96), 01P(098)
Регламент замены предусматривает смену трансмиссионного масла в АКПП каждые 50 тыс. км вместе с фильтром. Для продления срока службы стоит сократить периодичность до 40 тыс. км с заменой фильтрующего изделия.
Как проверить уровень масла?
- Уровень холодной ATF (20оС) должен быть не ниже уровня отмеченного 20оС.
- Уровень прогретой ATF (60оС) должен быть между метками Min и Max
- Температура ATF определяется с помощью подключенного сканера или VAGCOM.
- Заводится двигатель и селектор ставится в положение «P».
- Подключается сканер или VAGCOM, убедиться, что температура ATF не выше 30оС
- Вывернуть контрольную пробку, при этом из перепускной трубы сольется небольшое количество ATF. Убедится, что перепускная трубка ввинчена до упора. Не выворачивать трубку
- Следить за показаниями температуры. Если при температуре ATF от 35оС до 45оС из перепускной трубки начинает капать ATF, такой уровень считается нормальным.
- В противном случае (не капает) необходимо добавить ATF. После чего убедится в правильном уровне, закрутить контрольную пробку и выключить двигатель.
Замена масла в АКПП 01M VW
Замена осуществляется обычным способом со сливом старого отработанного материала, заменой фильтра и залитием свежего трансмиссионного масла. Работу можно выполнить самостоятельно при условии наличия нужных расходных материалов, инструмента и смотровой ямы.
Источник
Акпп 01p замена масла
Текущее время: 09.11.21, 01:14
АКПП модель 01P (EuroVan MV 2001-03)
Октавиан » 07.01.12, 14:24 АКПП модель 01P (EuroVan MV 2001-03)
Смотрю народ на форуме друг другу задает обрывочные вопросы про АКПП модели 01P .
Между тем в руководстве по сервисному обслуживанию (at_01p_serv.pdf) всё изложено безукоризненно.
Сайт — http://vwts.ru/page05_01p.html
Скачиваем второй пункт — Automatic Transmission 01P: Servicing (eng.)
Разве что только на английском. Постараюсь здесь сейчас перевести эти 23 страницы на русский!
Возникли трудности с переносом рисунков. Мужики, научите рисунки вставлять!
Овладею этой техникой — продолжу!
_________________________________________________________________________________________
Прокладка маслянного поддона.
Прокладка маслянного поддона (01P)
Рис. 1: любезно предоставлен VOLKSWAGEN UNITED STATES, INC.
________________________________________________________________________________________
АКПП : — проверять уровень масла через каждые 20 000 миль . Масло заливается
на весь срок службы агрегата и не подлежит замене, за исключением модели EQJ.
В АКПП модели EQJ масло подлежит замене через каждые 40 000 миль .
Прямая передача: — проверять уровень масла через каждые 40 000 миль . Масло заливается
на весь срок службы агрегата и не подлежит замене.
Британская и американская: 1 миля = 1609,344 м
_______________________________________________________________________________________
Проверка уровней масла в АКПП и ГЛАВНОЙ ПЕРЕДАЧЕ:
А) В АКПП —
1. Перед проверкой убедитесь в целостности предохранителей. Уровень заряда аккумулятора
должен быть не менее 11,5 вольт. Должны быть в исправности и соединения проводов
заземления двигателя и АКПП с массой. Всё электрическое оборудование выключить.
Температура АКПП должна быть не выше 30 градусов. Положение автомобиля должно
исключать какие-либо наклоны. Переключатель АКПП в положении «ПАРКИНГ».
1. Prior to checking ATF level, ensure all fuses are okay. Battery voltage must be at least 11.5 volts.
Ground connections on engine, transaxle and body must be okay. All electrical components must be
switched off. Transaxle ATF temperature must not be above about 86°F (30°C). Vehicle must be on
level surface and selector lever must be in «P» position.
2. Connect VAG 1924 ATF filling system to vehicle. Remove noise insulation tray. Connect vehicle
diagnostic, testing and information system VAS 5051. Select «08 — read measured value blocks» on
the touch screen. Select display group 005 via «Measured value block» and «Change display group
number». The first display zone shows the ATF temperature. The ATF temperature must not be more
than about 86°F (30°C) at the start of test.
3.
Connect VAG Scan Tool (1551) and enter address word «02 Transmission electronics» and advance
until «Select function XX» is indicated on display. Measure ATF temperature in measured value
block.
4. Press keys 0 and 8. (The function «Read measured value block» is selected with 08). Confirm entry
with key Q. Press keys 0 0 5. (005 selects the «Display group number 005»). Confirm entry with key
Q. The first display zone shows the ATF temperature. The ATF temperature must not be more than
about 86°F (30°C) at the start of test. Start engine. Raise and support vehicle. Place drip tray under the
transaxle. Bring ATF to test temperature of 95-113°F (35-45°C). Remove ATF level plug (A) from
the oil pan. See Fig. 2 .
5. The ATF present in the overflow pipe (2) will run out. If ATF drips out of hole, ATF does not need to
be topped off. Install NEW seal (1) to level plug and tighten to 11 ft. lbs. (15 N.m). ATF check is
completed. Ensure sealing plug (3) and cap (4) remain closed. See Fig. 3 . If only the ATF present in
the overflow pipe runs out of hole, top off ATF.
6. To top off ATF, pry off plug securing cap (arrow) with a screwdriver. See Fig. 4 . The securing cap
locking device will be destroyed when doing this, so always replace securing cap. Pull plug out of
filler pipe. On some transaxles, a cap with a spring retainer is installed. This cap can be used again.
ВНИМАНИЕ: VW ATF (G 052 162 A2) имеет светло-жёлтый цвет!
NOTE: In the following procedures, letters and numbers in parenthesis are shown in
illustrations.
NOTE: When ATF level is checked, the seal on the level plug must always be
replaced. VAG Scan Tool (1551) and Diagnosis Cable (1551/1) are
required to check ATF fluid level. Scan tool is used to measure ATF
temperature. Follow aftermarket scan tool manufacturer instructions (if
applicable) to check AFT temperature.
NOTE: The following detailed test procedures are described for VAG Scan Tool
(1551).
NOTE: An insufficient amount of ATF, as well as filling ATF to excess, affectsthe function of the transaxle.
7. Fill transaxle with ATF using VAG 1924 ATF filling system until ATF runs out of level hole. See
Fig. 5 . Install NEW seal (1) to level plug and tighten to 11 ft. lbs. (15 N.m). See Fig. 3 . Install
sealing plug (3) on filler pipe until the spring retainer lock locates, or install plug on filler pipe and
secure with a NEW cap. See Fig. 3 and Fig. 4 . Lock cap in place. The cap secures the sealing plug.
Выкручивание пробки уровня ATF из масляного поддона.
Рис. 2: любезно предоставлен VOLKSWAGEN UNITED STATES, INC..
Locating Plug Seal, Overfill Pipe, Sealing Plug & Cap
Рис. 3: любезно предоставлен VOLKSWAGEN UNITED STATES, INC.
Prying Off Plug Securing Cap
Рис. 4: любезно предоставлен VOLKSWAGEN UNITED STATES, INC.
Залив масла в АКПП с использованием Системы для залива ATF VAG 1924
Рис. 5: любезно предоставлен VOLKSWAGEN UNITED STATES, INC.
Raise and support vehicle. Remove filler plug on side of final drive. See Fig. 6 . Gear oil level should be at
lower edge of hole. If fluid is required, add G 50, SAE 75W-90 synthetic gear oil (G 052 145 S2). Install
filler plug and tighten to 15 ft. lbs. (20 N.m).
Проверка уровня масла в ГЛАВНОЙ ПЕРЕДАЧЕ:
Рис. 6: любезно предоставлен VOLKSWAGEN UNITED STATES, INC.
Рекомендованные масла:
а) в АКПП — ATF (G 052 162 A2)
б) в ГЛАВНУЮ ПЕРЕДАЧУ — G 50, SAE 75W-90 (G 052 145 S2) (Синтетику)
Объём (доза)заливаемых масел:
а) при замене в АКПП — 3,0 литра,
б) при заливе в сухую АКПП — 5,3 литра,
в) ёмкость ГЛАВНОЙ ПЕРЕДАЧИ — 0,75 литра.
DRAINING & REFILLING
1. To replace ATF, raise and support vehicle. Place drip tray under the transaxle. Remove ATF level
plug from the oil pan. See Fig. 2 . Remove overflow pipe through the level hole. Drain ATF. Install
overflow pipe. Screw level plug in hand-tight.
2. Fill with appropriate amount of ATF through filler pipe using VAG 1924 ATF filling system. See
FLUID CAPACITIES . See Fig. 5 . Start engine and shift transaxle through all the selector lever
positions with the vehicle stationary. Check and top off ATF level. See CHECKING FLUID
LEVELS . Tighten ATF level plug to 11 ft. lbs. (15 N.m).
ON-VEHICLE REPAIRS
ADJUSTMENTS
SELECTOR LEVER CABLE
Checking & Adjusting
1. Remove selector lever cable locking washer (6) from lever/selector shaft. See Fig. 7 . Take selector
lever cable off lever. Move selector lever from «P» to «1» position. Selector lever mechanism and
selector lever cable must move freely. If necessary, replace selector lever cable or service selector
lever mechanism. Always replace selector lever cable locking washer on transaxle support bracket
after disassembling.
2. To adjust cable, place selector lever in «P» position. Loosen adjustment bolt (2) on selector lever in
selector lever housing. See Fig. 8 . Place selector shaft lever in «P» position on transaxle. Locking
lever must engage in park lock wheel, with both front wheels locked. Tighten adjustment bolt on
selector lever in selector lever housing to 15 ft. lbs. (20 N.m).
NOTE: Various components may be serviced without transaxle removal. For
servicing of these components, see appropriate component under
ADJUSTMENTS and/or REMOVAL & INSTALLATION .
NOTE: In the following procedures, numbers in parenthesis are shown in
illustrations.
Exploded View Of Selector Mechanism Components
Рис. 7: любезно предоставлен VOLKSWAGEN UNITED STATES, INC.
Exploded View Of Selector Lever Components
Рис. 8: любезно предоставлен VOLKSWAGEN UNITED STATES, INC.
LOCKING CABLE
Shift selector lever into «P» position and turn ignition key to end (ignition off) position. Loosen locking
cable nuts (1) and (2) at frame. See Fig. 9 . Push locking lever (arrow) until it touches selector lever. Secure
locking cable in this position on frame. After adjustment, ensure ignition key operates properly.
Adjusting Locking Cable
Рис. 9: любезно предоставлен VOLKSWAGEN UNITED STATES, INC.
REMOVAL & INSTALLATION
NOTE: In the following procedure, numbers in parenthesis are shown in illustration.
NOTE: Locking cable must only be adjusted in its installation position. See Fig. 10 .
LOCKING CABLE
Removal & Installation
1.
Place selector lever in «P» position. Obtain radio security code (if equipped). Disconnect negative
battery cable. Remove selector lever handle, trim, cover, cover strips and selector lever console. See
Fig. 7 .
2. Remove locking cable from frame and take off from locking lever ball head. Remove ignition switch
trim. Press locking cable clip (4) out of ignition switch support and remove locking cable (2) from ball
head. See Fig. 10 . Remove footwell vent console. Take out locking cable.
3. To install, reverse removal procedure. Ensure proper routing of locking cable when installing. Adjust
locking cable after installation. See LOCKING CABLE under ADJUSTMENTS.
NOTE: In the following procedures, numbers in parenthesis are shown in
illustration.
NOTE: When battery is disconnected, vehicle computer and memory systems
may lose memory data. Driveability problems may exist until computer
systems have completed a relearn cycle.
CAUTION: Radio/cassette or radio/CD player is equipped with an anti-theft
protection circuit. Whenever battery is disconnected, radio will go into
anti-theft mode. When battery is reconnected, radio will display CODE,
and will be inoperative until proper code number is entered. Obtain
security code before disconnecting battery.
Removing Locking Cable
Рис. 10: любезно предоставлен VOLKSWAGEN UNITED STATES, INC.
VALVE BODY ASSEMBLY
Removal & Installation
1.
Place container under the transaxle. Remove level plug (1). Remove plug seal from plug. Remove
overflow pipe (2) and allow ATF to drain. See Fig. 18 . Screw overflow pipe in onto stop.
2. Remove oil pan bolts, oil pan, gasket and AFT screen. To remove conductor strip, place Pry Bar
(3373) onto stop under the solenoid valve plug. Pull plug off with pry bar in direction of arrow.
Remove bolt (1). See Fig. 11 .
3.
Remove valve body bolts and valve body. Shift selector lever/shaft into «1» position. Pull manual
selector valve out until it is just possible to unhook the operating rod (2). See Fig. 12 . Secure manual
selector valve so that it cannot fall out.
4.
Remove steel spring (arrow) and lever from selector shaft in transaxle. See Fig. 13 . For better
clarification, selector shaft is shown in illustration removed from transaxle.
5. Install steel spring and bolt to selector shaft. Do not tighten bolt at this time. Note installation
direction of sealing plug. Pull sealing plug out of housing before removing and installing free wheel,
otherwise the sealing plug and the «O» ring will be damaged. Moisten 2 new «O» rings with ATF and
install to sealing plug. Insert sealing plug in hole in transaxle housing (arrow). See Fig. 14 .
6. Secure operating rod onto manual selector valve by shifting selector lever/shaft into «1» position. Turn
manual selector valve so that shoulder faces operating rod. Guide operating rod with manual selector
valve into valve body. Tighten steel spring and bolt to the selector shaft.
7. To adjust operating rod for manual selector valve, move selector shaft to «P» position. Push operating
rod (2) with manual selector valve (1) into valve body onto stop (direction of arrow) and tighten bolt
(3) to 35 INCH lbs. (4 N.m). See Fig. 15 . Ensure selector valve is resting against the stop. Counterhold
when tightening bolt. Always replace bolt and manual selector valve retaining clip.
8. Install valve body and bolts. Tighten bolts to 44 INCH lbs. (5 N.m). When installing conductor strip,
route conductor strip as shown. See Fig. 16 . Ensure conductor strip is not kinked or twisted. Before
installing the ATF screen, insert seal in valve body. Firmly press ATF screen onto valve body. Install
oil pan, gasket and bolts. Tighten bolts to 106 INCH lbs. (12 N.m).
NOTE: In the following procedures, numbers in parenthesis are shown in
illustrations.
NOTE: Code letters are stamped on a metal tab located on valve body for
component identification. Metal tab must remain on the valve body. See Fig.
17 .
WARNING: Do not run engine or tow vehicle with oil pan removed or when there is
no ATF in transaxle.
NOTE: When removing the valve body, the manual selector valve (1) remains
in valve body. See Fig. 12 . Do not interchange manual selector valves
of valve bodies.
NOTE: Always replace steel spring and bolt for manual selector valve.
Prying Up On Conductor Strip
Рис. 11: любезно предоставлен VOLKSWAGEN UNITED STATES, INC.
Removing Valve Body & Unhooking Operating Rod
Рис. 12: любезно предоставлен VOLKSWAGEN UNITED STATES, INC.
Locating Steel Spring On Selector Shaft
Рис. 13: любезно предоставлен VOLKSWAGEN UNITED STATES, INC.
Inserting Sealing Plug
Рис. 14: любезно предоставлен VOLKSWAGEN UNITED STATES, INC.
Adjusting Operating Rod For Manual Selector Valve
Рис. 15: любезно предоставлен VOLKSWAGEN UNITED STATES, INC.
Installing Conductor Strip
Рис. 16: любезно предоставлен VOLKSWAGEN UNITED STATES, INC.
Locating Valve Body Identification Tab
Рис. 17: любезно предоставлен VOLKSWAGEN UNITED STATES, INC.
Exploded View Of Valve Body Components
Рис. 18: любезно предоставлен VOLKSWAGEN UNITED STATES, INC.
Таблица моментов затяжки резьбовых соединений:
Источник